Cool Hearts to Draw That Says I Love You
Northwardothing says love like a big ruby eye tied up with a bow. In this tutorial, we are going to show you how to depict a beautiful large love heart, in a few like shooting fish in a barrel-to-follow steps. Footstep-past-step, we testify y'all how to create the perfect centre shape, add realistic coloring, and and so add a final bow. Assemble your cartoon supplies, and let us begin our middle sketch.
Table of Contents
- one How to Describe a Perfect Heart
- 1.one Step 1: Draw an Isosceles Triangle
- ane.2 Step 2: Create the Sectionalisation Line
- i.3 Step iii: Describe the Left Circle
- 1.4 Pace 4: Cartoon the 2nd Circumvolve
- one.5 Stride v: Completing the Lesser of the Heart
- one.6 Step 6: How to Draw a Perfect Center Outline
- 1.7 Step 7: Drawing the Stripe of the Ribbon
- 1.8 Step 8: Adding a Bend to the Ribbon
- 1.9 Pace 9: Constructing the Bow
- 1.x Footstep ten: Finishing the Bow Structure
- 1.11 Step 11: Outlining the Bow of Your Heart Cartoon
- 1.12 Step xiii: Erase the Bow Overlap
- 1.thirteen Step xiv: Adding the First Coat of Color
- 1.14 Step 15: Shading Your Drawing of a Heart
- 1.xv Pace 16: Calculation Color Highlights to the Heart Sketch
- one.sixteen Pace 17: Calculation Colour to the Bow
- i.17 Stride xviii: Finishing Our Heart Drawings
- 2 Oft Asked Questions
- ii.ane Tin this Tutorial Evidence me How to Describe a Perfect Heart?
- 2.2 What Color Should You Use for a Drawing of a Eye?
How to Draw a Perfect Heart
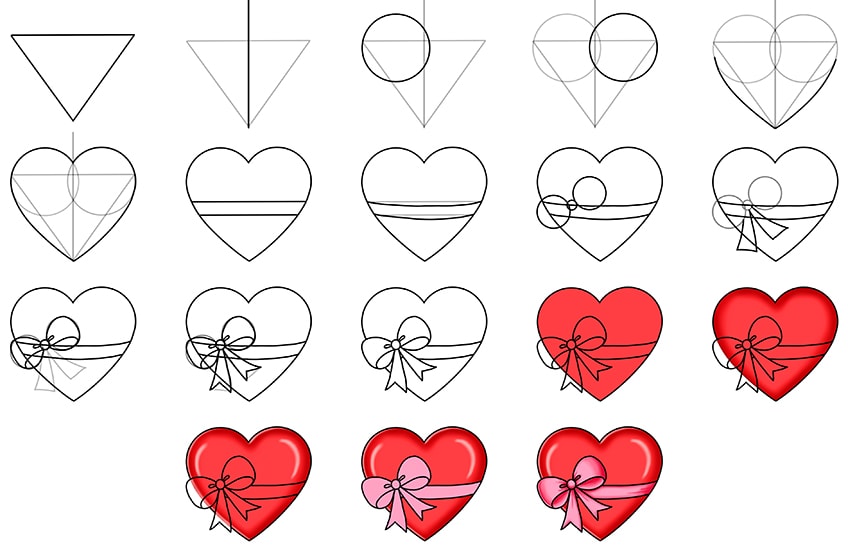
On the surface, a heart is not a difficult shape to describe. But learning how to draw a perfect heart, with perfect symmetry is a piffling more than catchy. As with all of our drawing tutorials, nosotros utilize a range of simple construction shapes to lay down the foundations of the cartoon, before we create the final outline.
In the collage below, you can see an outline of the steps that yous can take when drawing hearts.
The choice of medium for your drawing of a heart is fully yours. If you lot are a digital artist, you tin use a graphic tablet, or you can apply a more than physical medium like pigment or coloring pencils.
Whichever medium you choose, gather your supplies, and let us start drawing hearts.
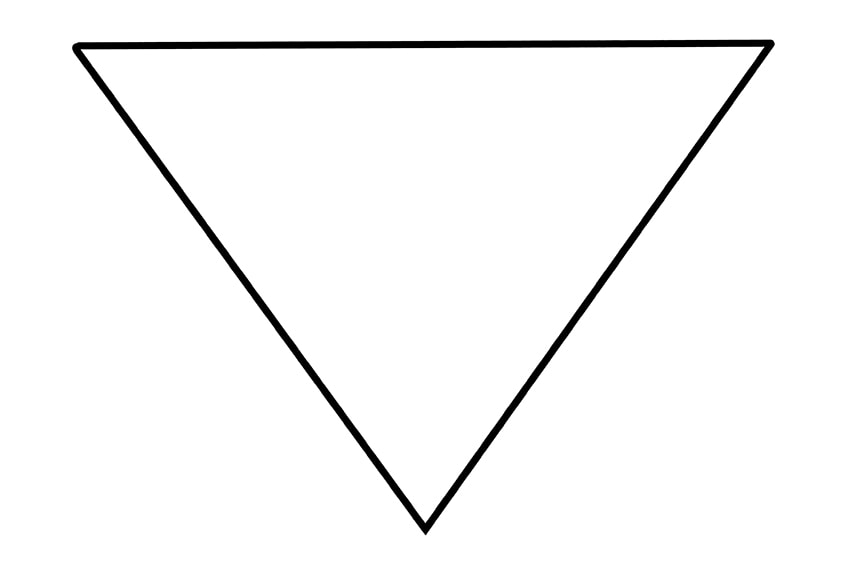
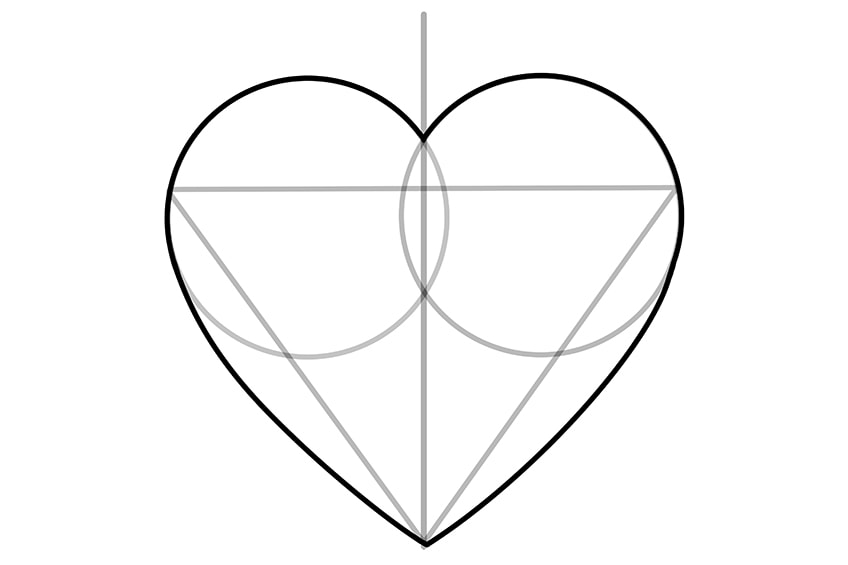
Step i: Describe an Isosceles Triangle
In this first step, you are going to lay down the basic shape of the center sketch using a triangle with sides of equal length. Find the central bespeak of your canvas, and depict the triangle upside-downwardly.
This may not expect similar a heart drawing at the moment, only the triangle will assist you draw a perfectly symmetrical heart sketch.
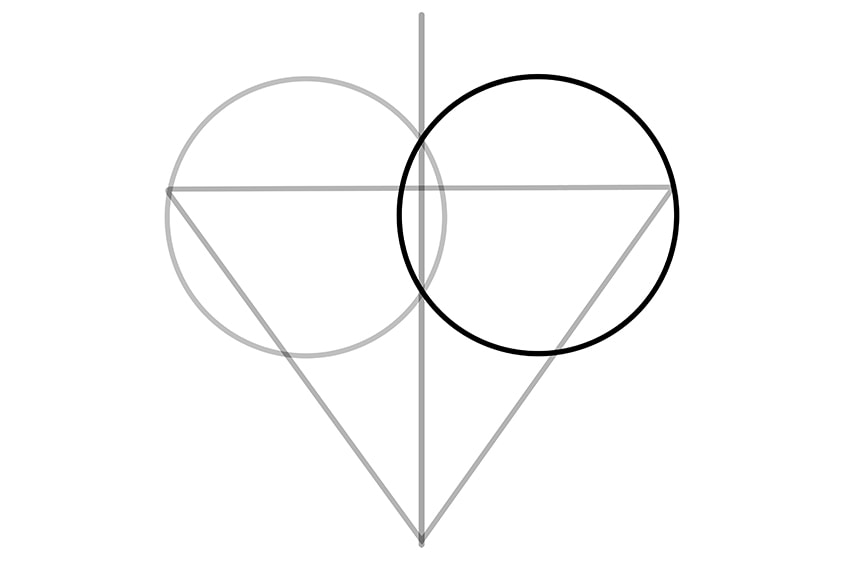
Step 2: Create the Partitioning Line
Detect the center of your triangle by locating the point at the bottom. Draw a vertical line from this point upwards and out the top of the triangle. This division line will separate the heart into 2 split spaces.
In subsequently steps, this division line will aid you draw the curves of your heart sketch with perfect symmetry.

Step 3: Draw the Left Circumvolve
In order to get a smooth curve on the meridian of your eye, you can use two circle shapes. This will ensure that the curve is fifty-fifty on both sides.
On the left side of the triangle, describe a circle that touches the left signal of the triangle, and overlaps the division line slightly.

Step 4: Drawing the Second Circle
For this stride, you are simply going to repeat the previous step on the other side of the triangle.
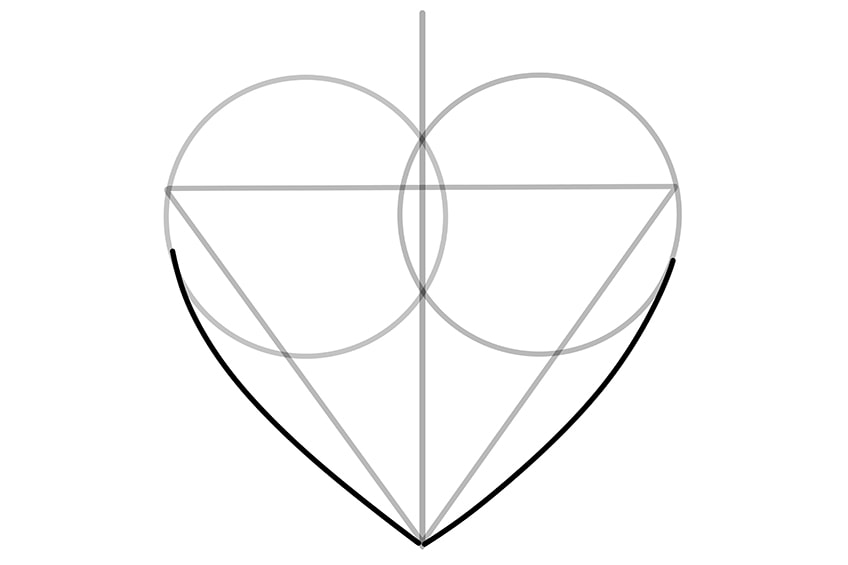
Stride 5: Completing the Bottom of the Heart
You are at present going to create the bottom curves of the heart. On either side of the heart, create a curve from the betoken of the triangle to join the circumvolve on each side.
Y'all should be able to see the final shape of the eye cartoon coming through.
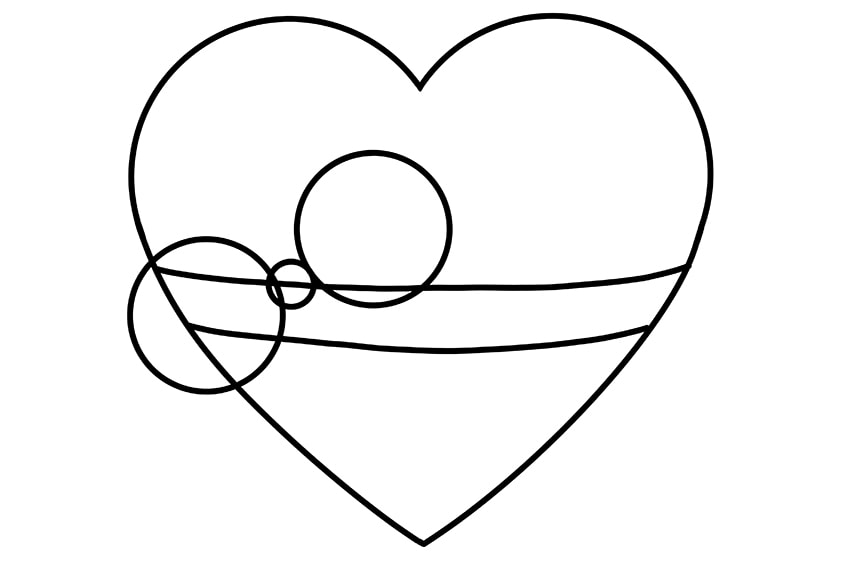
Step 6: How to Describe a Perfect Heart Outline
This pace is simple and by the end of information technology, you volition have a perfect drawing of a heart. Utilize the ii circles and the partition line to finish drawing the curvature of the heart symmetrically on each side.
You can now erase any of the visible structure lines.
Step 7: Drawing the Stripe of the Ribbon
You lot are going to brainstorm the ribbon of your heart drawing by outlining the horizontal stripe. These initial lines should exist construction lines, every bit they are going to be slightly curved in the next stride.
At the center of your heart drawing, simply describe two horizontal and parallel lines.

Step 8: Adding a Curve to the Ribbon
When it comes to learning how to describe a perfect heart, three-dimensionality is very important. To highlight the three-dimensionality of this heart drawing, you can add a footling curve to the ribbon strip that you just drew. This volition help it look like your ribbon is wrapping around the heart. But bend both of the ribbon lines down slightly.
You can then erase the initial structure lines.

Step nine: Constructing the Bow
This footstep is another construction step, then if yous are using a graphic tablet, create another layer. If you are using a pencil, utilize a calorie-free and easily erasable one. Begin past drawing a small circumvolve with its center on the pinnacle ribbon line. On either side of this, at a slight angle, draw two larger circles.
In the next steps, you will use these shapes to create the final shape of the bow.
Step 10: Finishing the Bow Construction
To cease the structure of the bow, depict the two flaps that extend down from the minor middle circle.
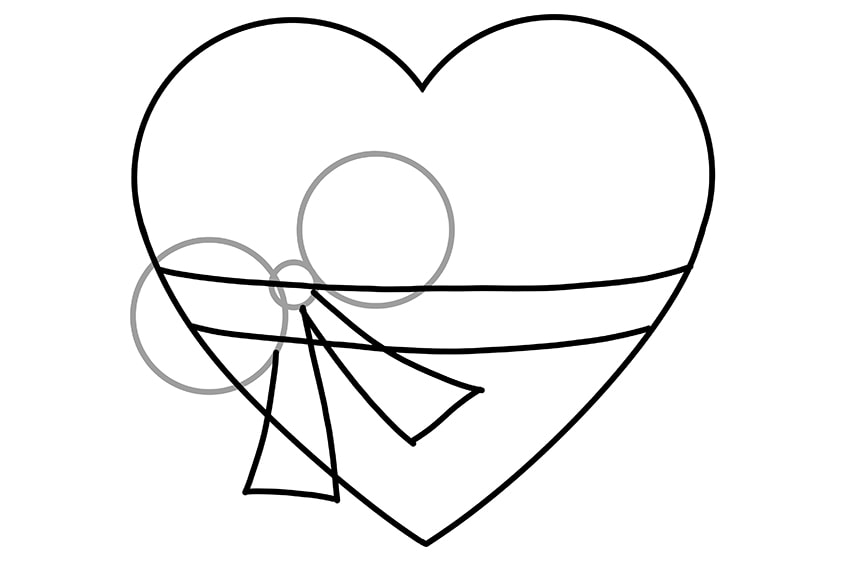
Stride 11: Outlining the Bow of Your Heart Drawing
Using the structure shapes you just drew, create the outline of the bow past adding a more realistic curve. Brand the within of the larger circles slightly narrower. Add a curve at the bottom of each, to create a three-dimensional event. Add two footling curves extending from the center circle. Finally, add a little cutting to the bottom of each flap.
You can then erase the construction lines once again.
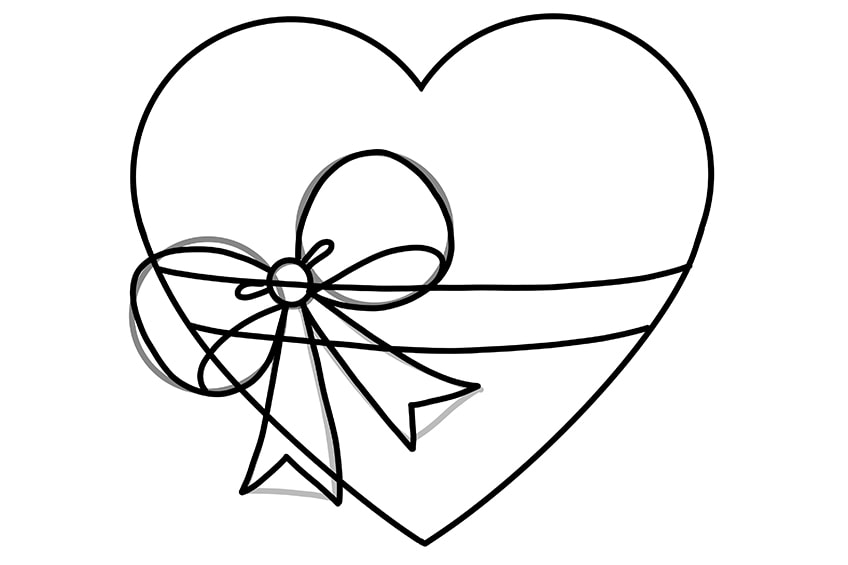
Stride thirteen: Erase the Bow Overlap
In this pace, yous are simply going to erase the lines of overlap within the bow of the ribbon and the heart.
At the end of this step, your drawing of a middle should look a little like this.

Step fourteen: Adding the Kickoff Coat of Color
To build upwardly a realistic color for your heart drawing that emphasizes 3-dimensionality, you need to build it up in a few steps. Using a regular castor and light red paint, fill the entirety of the eye with this colour.
The parts of the bow that are within the outline of the middle drawing can also be colored red.

Step 15: Shading Your Cartoon of a Centre
You are now going to shade the outside of the heart sketch to add more three-dimensionality. Apply a bear upon of black paint and a soft blending brush to add together shading around the edge of the middle.
Stop the blending with a clean blending castor and lightly smear the shading towards the center of the heart.

Footstep sixteen: Adding Color Highlights to the Eye Sketch
You are now going to employ some white paint and a sharp brush to add together highlights to the outline and center of your heart cartoon. Trace along the outline of the left side of your heart with a white highlight, then the left side of the right curve.
Yous tin can and so apply a small soft castor with a little white paint to add curved lines inside the two curves of the heart drawing.

Step 17: Calculation Color to the Bow
We are going to paint the bow pink, only you can make it any color you choose. Just use a regular brush and your color of option, and fill the bow with an even glaze.
In the final step, you are going to add some definition and dimension to the bow.

Step eighteen: Finishing Our Heart Drawings
To finish your perfect cartoon of a center, you are only going to add some shading and structure to your bow and ribbon. Utilise a darker shade of your ribbon color, and lightly pigment around the edges, within the iii-dimensional curve, and around the edges of the ribbon where information technology curves effectually the heart.
Finish the center drawing by adding a few stripes to the flaps.

Voila! You have simply learned how to draw a perfect centre. At present that you know how to perfect the dimensions of a middle sketch, you tin easily brainstorm drawing hearts for all of your loved ones.
Ofttimes Asked Questions
Can this Tutorial Bear witness me How to Draw a Perfect Heart?
Aye! You lot may think that yous do not need a tutorial to draw a heart, only if yous want to describe a perfect heart, then you can follow our construction steps. We will and so show you how to add color and dimension to your middle drawing.
What Color Should You lot Utilize for a Cartoon of a Centre?
The traditional color for hearts is carmine because they are associated with dear. You can, notwithstanding, make your eye any color you like! There is no limit to your creativity.
Source: https://artincontext.org/how-to-draw-a-heart/
Enregistrer un commentaire for "Cool Hearts to Draw That Says I Love You"